SVN (Subversion) repositories
We use Apache Subversion (SVN) to manage our SVN repository. If you want to learn more about it, there is a free book about Subversion.
This document uses an example: importing the CS499/src directory to repos.cs.uky.edu. You should adjust these instructions when you create your repository, import files, check out files, or other operations.
Log into repos.cs.uky.edu to run the script to create the repo space
ssh repos.cs.uky.edu
Create a repository
/usr/local/bin/csrepo -n project5 -p paul,hayes,calvert,raphael
This command allows the following users to make changes: paul, hayes, calvert, raphael.
Only the creator of the project needs to run this command. The other team members do not. In this case, assume paul is the owner.
Import files to your SVN repository
Assuming you have a directory called CS499/src in your home directory, and you want to import it into your SVN repo, then on any machine that has that directory:
svn import ~/CS499/src "svn+ssh://repos.cs.uky.edu/repos/$USER/CS499" -m "Initial Import"
The program prompts you for your password and then imports the directory into the repository, and it outputs something like the following.
svn+ssh://repos.cs.uky.edu/repos/paul/project5
aaaaaaa   bbbbbbbbbbbbbbbbcccccccccccccccccccc

aaaaaaa = the protocol, svn over SSH, required.
bbbbbbb = the host, accessible from the Internet
ccccccc = the directory.
Note
/repos is the top-level, paul is the repository “owner’s” CS
userid. project5 is the name you gave it in step 3. -m “Initial
Import” is a comment. It is typed on the same line!
Note
If you want to creat a subdirectory, specify it in the URL like this:
svn import ~/CS499/src/ "svn+ssh://repos.cs.uky.edu/repos/paul/project5/src/" -m "Initial Import"
This command creates and populates the src directory in the project5 repository.
Checking out a file
All project members can check out the files.
Note
Check local permissions when directories are created to make sure they have proper settings.
mkdir testrepo
cd testrepo
svn checkout "svn+ssh://repos.cs.uky.edu/repos/paul/project5"
ls -la
# ....make some changes to a file
svn update project5
# ....grab any updates before committing
svn commit project5
# ...add new file to project
touch newfile
svn add newfile
svn commit
Other commands
Once you have a local checkout of your SVN repository, you can see the status of its files
svn status -v  # local status
svn status -u  # contact the server to determine file differences
svn info "svn+ssh://repos.cs.uky.edu/repos/paul/project5/"
svn ls "svn+ssh://repos.cs.uky.edu/repos/paul/project5"
Important
Conflict resolution is a manual process and is needed if two users edit the same file. See the official documentation about resolving conflicts.
SVN Clients for Windows
Tortoise SVN
Tortoise SVN is an SVN client with a convenient GUI (graphical user interface). If you use Windows on a regular basis this is one of the best clients to use. Follow the steps below to set up your client to make it work with the Computer Science SVN repos.
Download the SVN client from Downloads and then install the software and proceed to the next sub-section to set up authentication and connection.
PuTTY setup
Download SSH client from PuTTY Downloads and install it.
Public and Private Key setup
The SSH directory of your CS account (~/.ssh) should contain your public and private keys. If not, proceed to the next steps to generate those. If you already have them, proceed to PuTTY setup in the next section.
Login into any CS server (we use distributed home directories) and execute the following:
$ ssh-keygen -t rsa
Accept the default names and file location and press enter when you are asked to enter a passphrase. If you chose to enter a passphrase then you will need to remember this information to be able to connect later.
While on your remote SSH session in your CS account, execute the following:
$ cat ~/.ssh/id_rsa.pub >> ~/.ssh/authorized_keys
This command makes public key authentication work.
PuTTY session setup and public key authentication
To complete this step you need to download your private key (the one generated with ssh-keygen or the one you already had in place in your CS home directory).
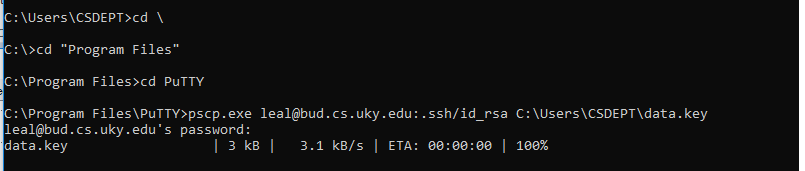
By default, the PuTTY installation includes pscp.exe, which can help you to download your private key to your Windows Machine. Follow the steps in the picture to download your private key, adjusting the username and the server name (any server you can access).
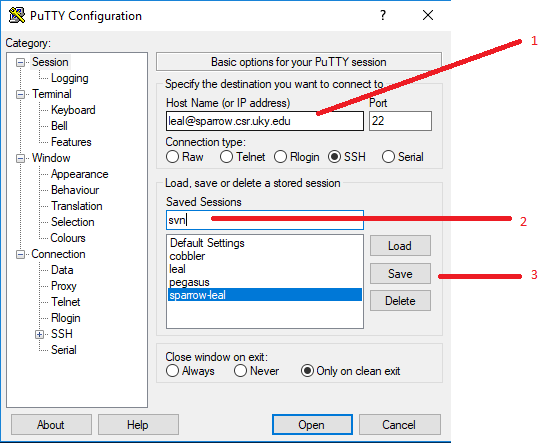
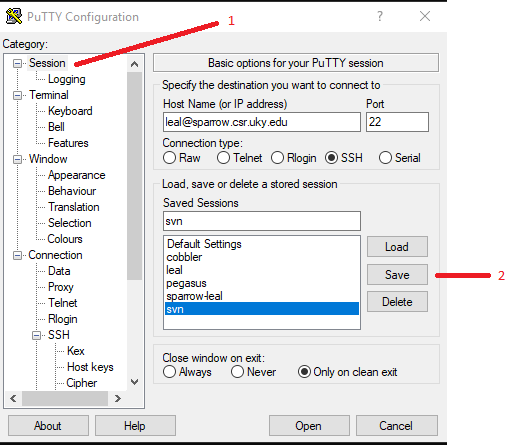
Now set up a PuTTY session, configure its public key authentication, and test it: Open PuTTY and create a session, as detailed in the picture. The session should point to the SVN server, normally repos.cs.uky.edu. In this example, we use sparrow.csr.uky.edu instead. Make sure you use your CS Account name (or your linkblue ID username, if that’s what your account is called) on the left on step #1. However, step #2 can be anything; it’s just a label or identifier. The purpose of step #3 is to save the named session for future reference.
Test the session to see if it works: Open PuTTY and click the session name (in this case svn) that identifies the SVN server, and click open as detailed in the next picture:
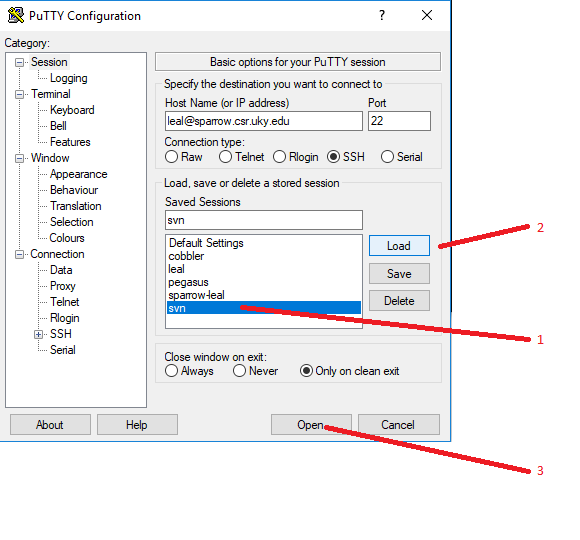
The server will ask for your account’s password.
Note
The Load option is just to make changes to the configuration. When connecting we can just use Open.
Converting your private key with puttygen
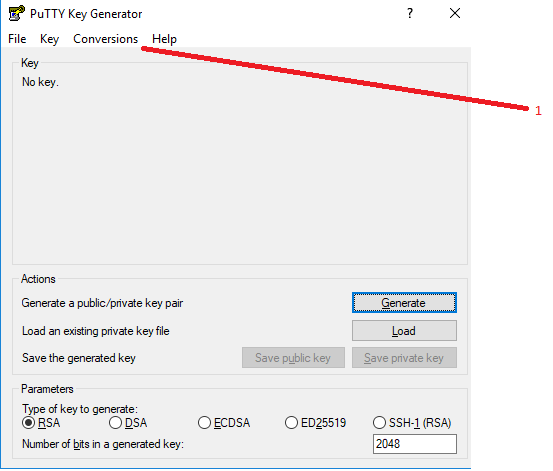
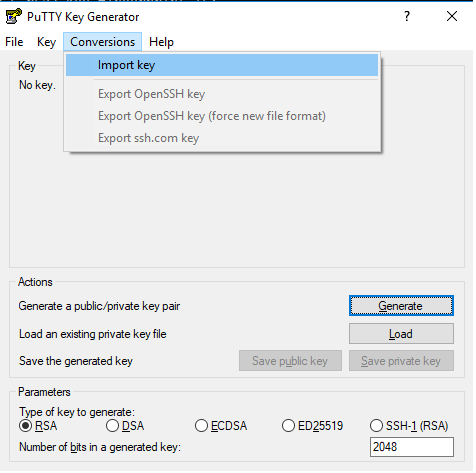
Locate the private key that you downloaded at the beginning of the setup. Open puttygen.exe, which is usually in C:\Program Files\PuTTY. Alternatively, you can click the Windows Key to open the start menu, where you can type puttygen.
We need to locate the private key we copied with pscsp.exe. Use the Conversions menu in PuTTY, selecting the Import Key option, as detailed in the following pictures.
Locate the private key you downloded:
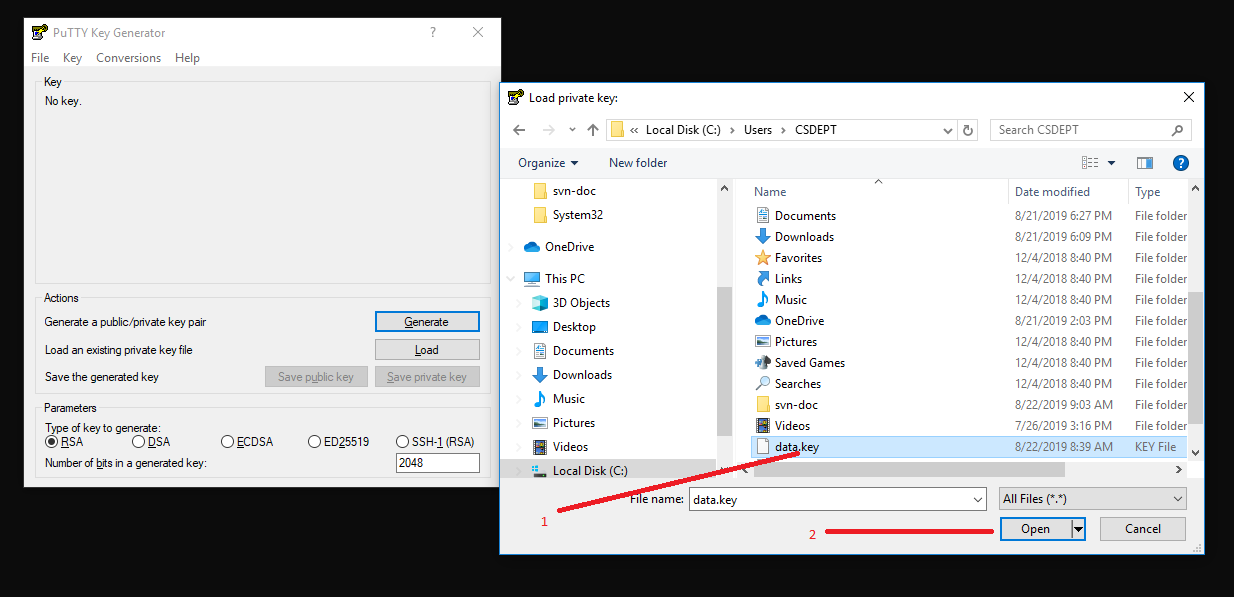
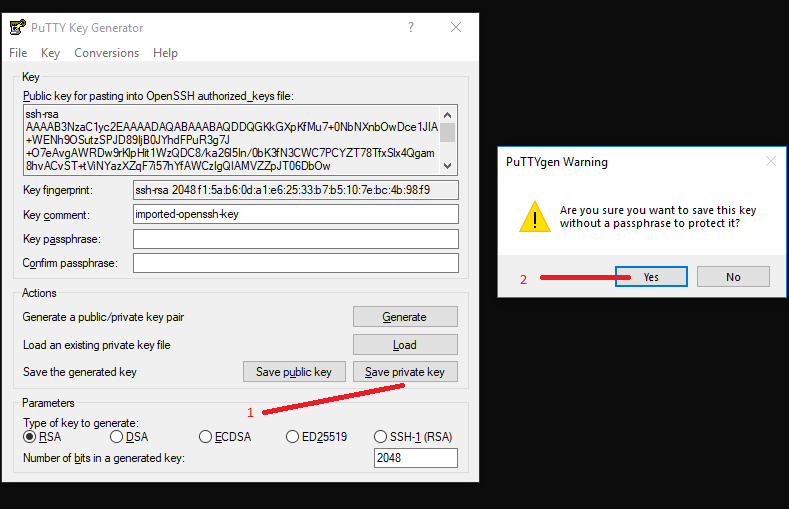
Important: Save the file in a standard location that doesn’t change. PuTTY or any other tool that uses PuTTY’s saved sessions needs this file in order to authenticate. Otherwise, the public key authorization process will fail. Click on any picture to see the unscaled versions of them so you can see all the details, options, etc. if you need to:
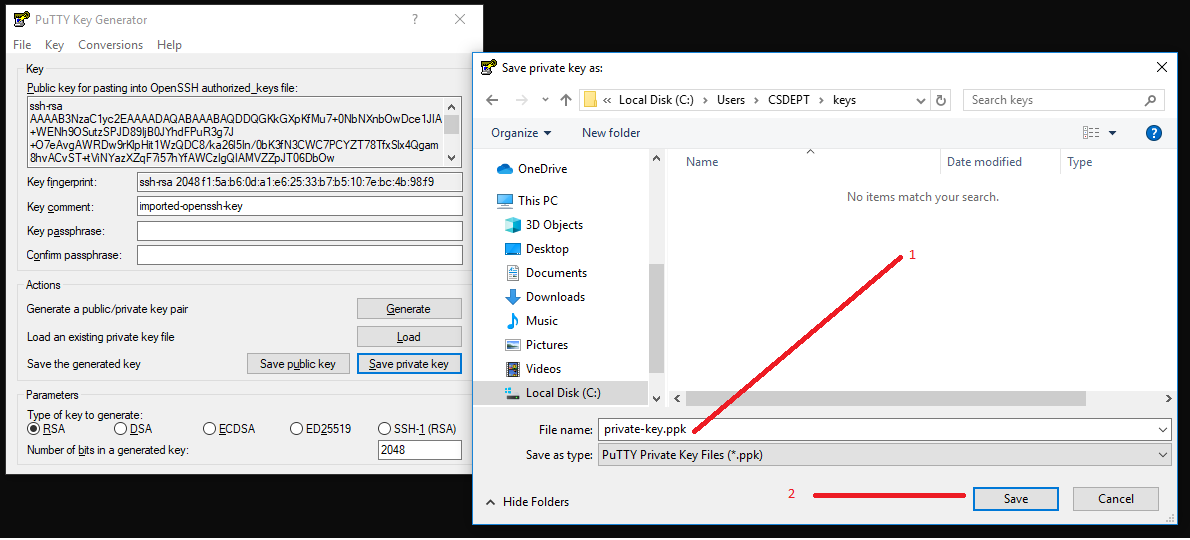
Now with the PuTTY ppk (PuTTY’s private key format) file saved, open PuTTY and execute the following steps:
- Click on your saved session name (this document uses svn) and click Load.
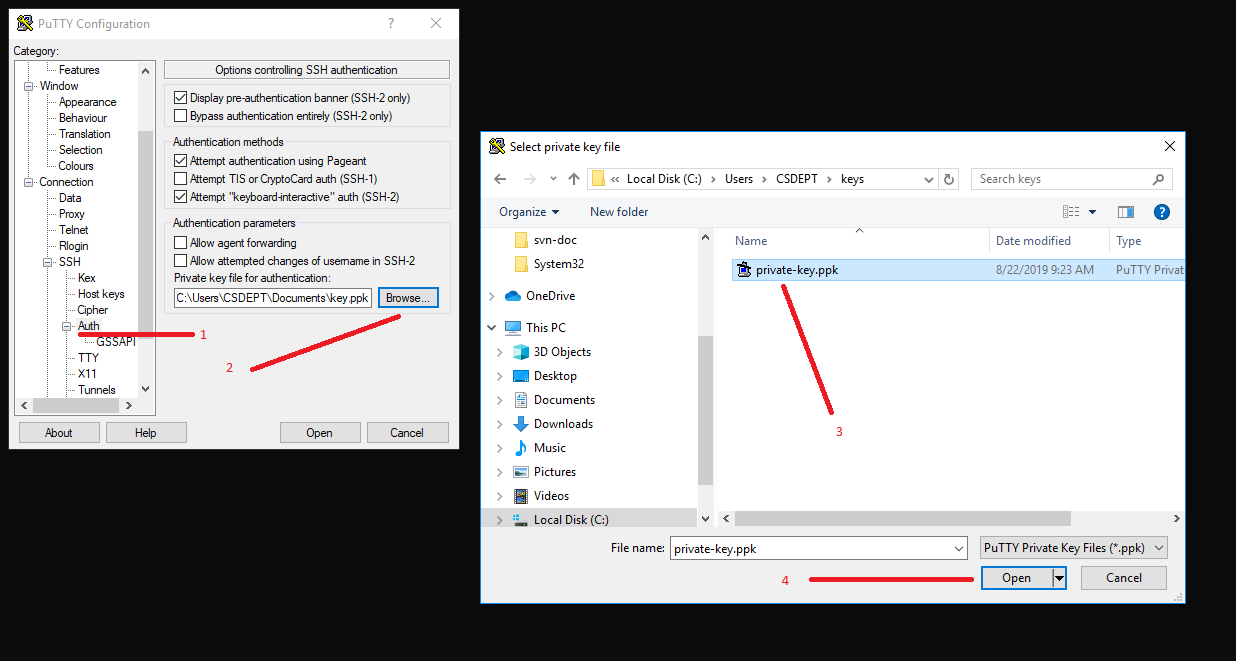
- The left panel has several options. Scroll to Connection and click on +SSH to unfold the menu. Click Auth. Load the converted private key (the one made with puttygen) as detailed in the next picture.
Important
Should you lose your private key for any reason Tortoise will not work (technically it will work, but for each SVN operation it will ask for your password, and SVN operations could be in the order of hundreds for any given session). To correct this problem, you need to start over from the beginning of this setup by getting the private key from your account on the CS Servers, and then going through the other configurations documented here.
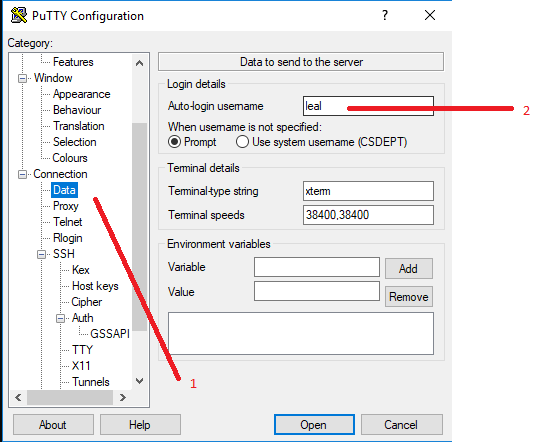
3. Now, again in the left panel, under Connection, click Data. In the text field Auto-login username write your CS Account username, as detailed in the next picture:
4. On the left panel, go up to Session, click it, and then click Save on the right side of the window to save the session with all the configuration that you changed (adding the private key and the auto-login username), also detailed in the next picture:
Testing the session created
Before we move to Tortoise’s final configuration, we need to test new PuTTY session. Select your putty session and click the Open button (or just double-click the session name on the center of PuTTY’s window). The software will attempt to login using public-key authentication.
If that step succeeds, continue to the next section to do the final
configuration of
Tortoise. If you face any problems review all the steps again, or just write
to us at help@cs.uky.edu and we will be more than happy to help you.
Note
After these steps work, you don’t need to use PuTTY any more if you don’t want to (unless you need to login through ssh into a CS Server), so you can close all PuTTY windows. Tortoise automatically uses the PuTTY session you have just created.
Final configuration and Browsing the SVN repos
Right click your desktop and access the submenu TortoiseSVN. On the unfolded menu, click Repo-Browser. A dialog helps you set up your repository.
Use the following convention, so Tortoise can save the configuration. Check the following picture to see what to write on this dialog:
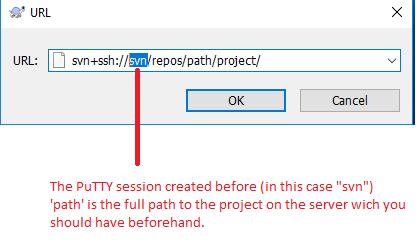
For this example, the svn part (selected in the picture above) of the
repository
URL is important: It’s the PuTTY session name created before. Make sure to
put the correct session name here. It doesn’t have to be svn, but it needs to
be the PuTTY session name you created. In this way, Tortoise can find
(through plink) the session and can browse the repository using the
public key setup.
Once you click OK, Tortoise SVN will browse the repository, and you can continue with your research. If you face any problems following the documentation, please write to help@cs.uky.edu so we can help you.